The Best $50 Lens Ever.

 Art, Photography, Technology  Comments Off on The Best $50 Lens Ever.
Dec 272014
 

Okay, when I got the adapter, it was $150. But the lens itself was an amazing find.

I’ve had my A7 for a few weeks, and now my plan is to get rid of my Canon 60D and all of my Canon gear, except my IXY. I don’t need the extra gear.

I started looking around for a good telephoto replacement that I can adapt to my A7. I did a lot of frowning at the computer screen as I looked at some of the major online retailers, but it’s really hard to commit to buying a used lens I haven’t laid hands on.

We have a good local camera store that has a lot of used lenses, so I went by to take a look. They had a “mystery box” full of lenses they just got in, and I spent about 20 minutes looking through, until I found a great little Canon 70-210 f/4 Macro in an FD mount. The glass was perfect! $50, and it was mine.

I put it on my A7, and, uh-oh. It wouldn’t focus out to infinity. Was it the lens, the camera, or the cheap $30 adapter I got on Amazon a few years back for my Nex? Turns out it was the adapter. I picked up a Metabones adapter, which is in the middle of the price range for adapters at $100, and now it focuses out perfectly.

Since the 70, 100, 135 and 210mm lengths are all marked on the barrel, it means I can use the lens with the A7’s image stabilization, too! It’s a dual action focus/zoom barrel. Pull to zoom, twist to focus.

The macro part of the lens was a nice discovery. At 70mm, you can turn the focus into the macro zone and get up close. It makes this a great all-purpose travel lens. Honestly, this and my Leica 35, and I don’t really feel like I need anything else. The 35 for wide shots, and this for anything else.

I put both lenses and camera through their paces in the NC mountains, and got some great shots. I’m really enjoying this combo.

Sony A7 Mark II

 Art, Photography, Technology  Comments Off on Sony A7 Mark II
Dec 172014
 

After the JLPT in DC, I ordered the new Sony A7 Mark II body, and it showed up a few days later.

If you’re expecting stats, then move on. This is more of an impressions report than anything else. What I liked, what I didn’t.

My initial thoughts? Tinged with confusion because the manual wasn’t so hot. I wound up calling Sony because I wasn’t sure why some functions wouldn’t work with my manual focus lenses. Part of it was on me, but part of it was a slightly confusing message that kept popping up.

Once I got that sorted out, I fell in love with it.

The menu UI isn’t perfect, but the shooting experience with it is great.

The viewfinder fooled me a few times into thinking I was looking directly through glass. It’s really sharp. Better than the rear LCD panel.

The customizable C1-C4 buttons on the body make it a manual focus shooter’s dream. I assigned the focus magnifier to C2, so I just have to press it once or twice, and I can get nice sharp focus. Then I assigned the image stabilizer to C1, so I can set the focal length of my MF lenses with a button press, a dial turn, and another button press. That’s about as fast as you can make it. I put ISO on C3, so I can tear through my ISO settings, depending on what I want to shoot.

There’s a ton of customization in the menus. It’ll take a little while for me to tweak it just the way I want it, but there’s a lot I can either tweak or ignore.

The camera feels great in my hands, and shoots great. Is it loud? Who cares? Honestly, I don’t get the obsession over shutter noise on the A7 cameras. I guess it goes make a certain amount of noise, but not enough for me to care. I’m more into getting good shots. It does that!

The image stabilization is great. It feels like I get 2-3 more stops of hand-holding out of the camera. There’s a noticeable difference when it’s turned off.

It also has a well-thought out auto-bracketing mode, that I set on 3 shots 1 stop apart, and just left it there.

The NFC is useful if your phone does NFC, I guess. You need to download an app and you can control the camera with your phone. It’s kind of hit-and-miss. There’s a whole Sony app store for the camera. It’s kind of cool, but it’s also sigh-inducing, too. (Another user ID and password, and something else to manage? Ugh.)

What’s most important to me is that I can take the pictures I want without thinking about the camera. I think about the photo, and that’s about it. In that regard, this camera is great.

My only gripe is a lack of native full-frame E mount lenses that are affordable. There aren’t many full-frame lenses on offer, and the ones that are AF are all pretty expensive. I already have some Leica M glass from 10+ years ago, so I’m covered, but it would be nice to have one native full-frame AF lens. Gotta start saving on the side for that, I guess.

Mac Pro Video

 Art, Education, Music  Comments Off on Mac Pro Video
Sep 152014
 

I own a couple of Macs, but the newest one is a Mac Mini from 2006 or so. So why did I sign up for Mac Pro Video? Well, it wasn’t for Mac-anything. I found a good deal on their site– $15/month for as long as I want. And since I also finally bit the bullet and signed up for Creative Cloud, MPV looked like the best compromise for me.

I’m really into music production, but I’m also really into visual arts, web design, and programming, even. MPV has some absolutely awesome video series on music production, covering not only theory, but also DAWs, and some of the harder-to-get-used to plugins. And while there are a lot of great dudes on YouTube with great info, MPV has some great tutorials. I especially loved their series on Ableton’s Push.

And now that I’m getting in to Creative Cloud, the tutorials should come in handy,  rather than spending a couple of hours trying to find good YouTube videos. It should be a nice complement to Pencil Kings. (The Photoshop tuts there were great, as are a few of the drawing tuts I’ve been working on.)

Pencil Kings

 Art, Education  Comments Off on Pencil Kings
Aug 042014
 

To improve my photography, I work on my visual sense. So I draw. To work on drawings and photography, I use Photoshop (and other programs). But my drawing has always kind of… what’s the word?

Sucked.

Yeah, that’s it.

Well, I kept hearing good things about Pencil Kings, so I’m in the middle of giving it a shot. In particular, I’m working on Sycra Yasin’s very thorough tutorial on painting in Photoshop. It’s a really good way to sharpen up those Photoshop skills. For photography, I use Lightroom more often, simply because I think it’s a better tool than Photoshop for dealing with a giant pile of photos without that… Photoshop look.

So far, I’m digging the info in the tutorial, even if I’m sick of drawing the pears and apple. Oh well. That’s how practice is. You draw the dull stuff to make the cool stuff.

It’s worth giving a look. The pricing isn’t too bad– $99/year or $250/lifetime. I’m giving it a year, and if it works out, I’ll do the lifetime thing.

Fireworks!

 Photography  Comments Off on Fireworks!
Jul 052014
 

I went with my GF and her mom to the local fireworks display. This year, I was going to get the photos right! I studied! I had the right tripod! I was ready to go! (I even bought earplugs, because it’s always so freakin’ loud here.)

And then with 2 minutes before it all started, a group of people sat right in front of me and screwed up my setup. Thanks.

Undeterred, I improvised as best I could, but by the end of the show, I found out that my focus had shifted all the way to the wrong side.

I’m going to take a look at the photos soon and try to salvage a few. If it’s possible, I’ll post them here.

Snowmageddon For Real

 Photography  Comments Off on Snowmageddon For Real
Mar 022014
 

We finally got hit by the a decent blizzard a couple of weeks ago, so I took a bunch of pictures. The snow event lasted for about two days. Very inconvenient, but also fun.

This is a placeholder post until I get the photos up and in.

Slide Duplicating Rig Completed! (Converting FL Bellows to NEX Mount!)

 DIY, Photography  Comments Off on Slide Duplicating Rig Completed! (Converting FL Bellows to NEX Mount!)
Feb 022014
 

I finally got the parts and tools together, and got this rig together.

I have a Canon FL Bellows with a slide duplicator on the end, and a Sony NEX mirrorless camera. Fortunately, the NEX isn’t too picky about accepting other lenses, so long as you have an adapter that ends in an E mount.

I followed the advice in this post on the Fred Miranda forums (which I mentioned earlier), and I figured I would elaborate on how to attach the L39 to NEX mount on to the Bellows FL, because the OP didn’t really go into much detail.

First, get an L39 (Leica Screw Mount) to NEX mount adapter. There are tons of them out there. I got a Fotodiox adapter for about $20 on Amazon. You want one with a shiny metal liner (which the L39 lens would screw into) that’s held in place with 3 grub screws. (Grub screws are headless screws that are buried in little holes on the sides of the barrel.)

To back out the grub screws, you’re going to need the tiniest screwdriver you can get. In my case, I needed a 0.7mm hex head. It’s just the head– it can be screwed into a handle, or you can just use the bit. I found mine at Harbor Freight as part of one of those microtool interchangeable head hand tools.

It also helps if you have a really bright light, and a magnifying glass. You’re going to be dealing with a lot of tiny screws.

Ok, Got Your Stuff? Let’s Install It!

First, remove the FL mount ring. It’s the shiny metal ring on the back of the FL Bellows. Start by removing the two screws holding the handle on, remove the handle, then remove the retaining screw on the ring. Back the ring out by unscrewing it clockwise. (Righty-loosey for once.) The ring should come off pretty easily. If it gets really tight, you’re turning it the wrong way.

When the ring is removed, there should be one little flat-head screw left at the top of the remaining mount. It will poke out into the area you’ll be mounting the L39-NEX adapter, making it impossible to get the adapter to hold on, so back it out. Take all of these parts and store them in a little baggy. Or recycle them. It’s up to you. (I’m in the baggy camp.)

Back out (but don’t remove!) the grub screws in the L39-NEX mount until the threaded shiny liner pops out. You may need to use a tool with a handle to get enough torque to break the seals.

Now you need to attach the NEX mount to the end of the bellows. It’s more of a matter of positioning the mount and making sure the grub screws are tight. There are two tricky parts here.

First, the bottom right screw is hard to get at when the mount is in the correct position. I used just the head of the driver tool. The bellows hardware gets in the way otherwise.

Second, the red dot on the mount needs to be in the right position. I put it right around 9 o’clock on the ring. To get it close enough, I mounted the NEX and carefully backed out one of the grub screws a hair, then gently moved the mount until everything was parallel and square.

I suppose you could add something like Loctite or JB Weld to make sure it never comes off, but in 5 years some other mount may be the favorite of the day, so I would advise against doing that.

What’s going on here is that the grub screws from the mount are grabbing the end of the old FL mount, which is a smooth tube. It’s a friction fit, so don’t torque it too hard, and be careful when using it for shooting. (Support everything!) I have no idea how prone this setup is to falling apart– only 3 tiny screws are holding the whole thing together.

Duplicating Slides

I dropped in a 35mm f3.5 lens and checked out a test slide, and it fits in the frame just fine now. There’s just enough distance between the bellows and the sensor now that I can get the whole slide duplicator in the frame. I’ll try the 50mm f3.5 macro later and see how it works.

More Coursera Fun

 Education, Music, Photography, Technology  Comments Off on More Coursera Fun
Jan 202014
 

Prof. Donald Hornstein is a fun lecturer to listen to. I highly recommend his new Coursera class on Environmental Law. If you have any interest at all in the environment or in law, take it. (Even for you lawyers out there– it’s a fun refresher.)

I take my CLE every year at the UNC Festival of Legal Learning, and every year, I look forward to Don Hornstein’s lectures. They’re not just entertaining, they’re also fascinating. He takes a subject that at times can be really dry and breathes life into it.

I also signed up for a class called “Write Like Mozart.” It started a few weeks ago, so I’m already behind. I’m going to have to hustle to catch up, but there’s some really interesting stuff going on there. I’d like to learn more about 18th century voice leading!

Is Paddy the Coolest Thing Ever???

I was sitting here, surrounded by my MIDI gear, when I had a thought that other people have already had. “What if I could use this stuff to edit my photos in Lightroom? Wouldn’t it be a heck of a lot faster?”

The answer is yes, so long as Lightroom doesn’t break the plugin you’re using.

Paddy is a program developed as donation-ware, that lets you use just about any MIDI controller to control the sliders in Lightroom to develop photos. If you’ve used Lightroom for any appreciable length of time, you know that fiddling with the mouse to change levels for all of Lightroom’s sliders is finicky business. Sometimes the sliders misbehave, sometimes the mouse misbehaves, either way, it’s tedious.

What Paddy does is take that tedious, repetitive mouse clicking, and if you have an old MIDI mixer with some motorized faders, you can zoom through editing photos in a snap. The faders will automatically go to the positions of the current photo in Lightroom, and you can just mess around with them as you please. I love the idea of this kind of tactile feedback, as well as the idea of mixing MIDI and photo developing.

This is one of those things I need to put on the “Come back to this in a few months” pile and see how the software is progressing.

You Komplete Me

 Music, Photography, Technology  Comments Off on You Komplete Me
Dec 052013
 

Komplete Ultimate showed up today. It comes on a shiny little hard drive, and the install takes about an hour or two. I installed the full version of Kontakt first, then registered it, then installed the Komplete Ultimate cross-grade, and everything went just fine. I’m excited to get more into it. All of it. There’s a lot of it!

I’ve been looking at some of the other deals out there. One VST I picked up was SynthMaster, because it sounds great, and it was on sale for $49. I really like the sounds it makes. If you pay more, you can get more patches. In the case of SynthMaster, some great sound designers have made some really amazing patches, so I picked up a few to go with it.

I also picked up Chromaphone by AAS, because I’ve been looking for a good percussion modeling VST. I realize that Chromaphone does more than that, and, in fact, it does a lot of really wild and interesting things, too.

The last thing I picked up was a second monitor, because photo editing with just one monitor drives me nuts. Also, working in Reason with only one monitor also drives me nuts. I like having the sequencer/mixer in one window, and the rack in another. I found a Dell monitor on sale at Amazon, but it showed up with a bunch of dead pixels, so I sent it back. Unfortunately, I couldn’t get another one, so I had to spend a little more to get an Asus monitor.

Now that I have two monitors, though, I realize that I need to do something about my desk.

It’s always something, huh?

Oh, my new dryer showed up yesterday. It dries clothes beautifully, and it was cheap. Did mention it was cheap?

Celebrating Pocky Day in Manhattan

 Food, Japanese Language, Photography, Travel  Comments Off on Celebrating Pocky Day in Manhattan
Nov 112013
 

Happy Pocky Day. (11-11!)

I celebrated by heading to the Metropolitan Museum of Art. The recommended donation now is $25! Ouch! I saw a lot of exhibits at the museum that bring back memories of my childhood, like the Egyptian section and the Temple of Dendur. We used to come to the MMA when we lived in NJ, and I always looked forward to it. It’s one of my favorite museums in the world.

After looking at the Egyptian section, I looked at the American Decorative Arts section, then at the sculpture garden, then another favorite section of mine, Arms and Armor. I’ve always been fascinated at the various inventions humans have created to protect themselves from… other humans. And plate armor just looks cool. I’d hate to wear the real thing, though.

Then I broke for lunch. Lunch was in the basement cafeteria, which is the cheapest place to get lunch.

First I had to find it. It took a little wandering and map-consulting, but I found it.

It was about $25 for lunch, but it was good. I just wish I could have gotten a plain turkey sandwich, instead of something with cranberry mayonnaise on it. I like cranberries, and I like mayonnaise. I would just rather pick the dressing myself.

I swung by the medieval statues I saw on the way to the basement, and snapped a few photos with my phone, then snapped some more of the statue garden on my way to the modern art section.

I wandered around the modern art section, and finally found my favorite painting in the building. It’s a Jackson Pollock painting called “Autumn Rhythm.” I don’t know why I love it. I just do. That’s art.

By then it was about 2:30, and time to head out. I found souvenirs for everyone, headed out the door. I got a few shots of the building on my way out with the Nexus 5.

On to Times Square, and Kinokuniya

I grabbed a train to Times Square, then headed to Kinokuniya to do some more shopping, but really, by now I have all the books I need. This was more of a “make sure” trip. I really wish I had a Kinokuniya or similar book store nearby.

Then I headed back to the apartment to clean up and get changed. I was going to meet up with some friends in Greenwich Village for dinner. I got all cleaned up, and headed out.

Oh, My Battery!

We met up at Oh! Taisho! at around 7 or so, and had a nice conversation at dinner. The food was good. It was yakitori and other bar-style food. We talked forever, then went over to Starbucks and talked some more. It was a lot of fun.

But my battery was almost dead by 9. I had to borrow a portable battery charger from a friend of mine. I wasn’t happy about that. This is after recharging the battery once while I was changing. I’m not sure if it’s a driver thing, or a Kit Kat thing, or a Nexus 5 thing.

By about 10 or so, I had to head back, because I don’t want to be out too late and wake up my SO’s parents, so we said our goodbyes.

Tomorrow I go back home. It’s supposed to snow.

Career Forum Day Two, etc. etc.

 Food, Japanese Language, Photography, Travel  Comments Off on Career Forum Day Two, etc. etc.
Nov 092013
 

Day two of the Career Forum, and my last. I’ve seen everything I want to see, and talked to everyone I want to talk to. I talked to a few companies, had a couple of brain cramp moments, but generally feel okay about it.

If something comes through, great! If not, I’ll keep freelancing.

I headed back to the hotel, changed, and had lunch. Then I got my stuff together and headed to the USS Constitution, to get a good look at it before the last tour of the day. I just made it to get on board, but I missed the last guided tour. I did get a chance to take some photos with my NEX and my Leica 21/2.8M ASPH lens, though.

I went back to the hotel, rested for a little while, then headed to the same Japanese restaurant I went to last year, Shiki in Brookline. It’s about a 45 minute trip by the green line. I had 20 minutes to kill before my table was ready. There wasn’t anywhere to wait, so I waited outside.

I had udon. It was good. The service was a bit on the slow side this year.

Tomorrow I head to New York.

Glass in Durham

 Education, Music, Photography, Technology  Comments Off on Glass in Durham
Oct 052013
 

Google brought its Glass wearable device to Durham today, and it was a madhouse. A controlled madhouse, but the lines were huuuuge.

Kudos to the Google staff, who managed the hordes of people who showed up. I only had to wait in line for about 30 minutes, and I came a little late. (Like at 11 am.)

Everyone was excited. We got little booklets that explained how to use Glass before we even went in. And they had waiters bringing us water so nobody got dehydrated.

Once I got in, I had to sign a release, then we went off into our little orientation groups. Then we got to try it on for about 10 minutes.

It’s a really neat device. My unit didn’t connect to WiFi, though, so it didn’t do much. But I can see how having it could be really useful for anyone who shoots video. I’m not as sold on the serious photography aspect, but I’m a camera snob. If the lens is too small, I have problems taking it seriously.

But I bet you could make some really interesting videos with this.

The heads-up display isn’t really a HUD. It’s more like a little TV that hovers just off and to the right. It’s not quite as earth-shattering as I was hoping for.

In my vision of a vision enhancing technology, it would be a real HUD that would give you an overlay layer on reality, like drawing big fat arrows on the pavement as you’re driving along to tell you where to turn, instead of making you look at a little monitor and look away from the road. It would kind of be like a world where your computer is a really good, really fast graffiti artist.

But I think that kind of tech is about 4-5 years away at least.

After we played with it, we could go upstairs and get food and beverages for free, and a poster. I skipped the food, grabbed a poster, and left. I had music composition later on, and I needed to get ready for it.

That’s been a fun class so far. Lots to learn, but a nice environment. I’ve already written one piece, too. It’s not great, but it’s a start.

I’m also cramming A+ material into my brain as fast as I can. I have my first A+ test on the 11th. Gotta study.

Progress Report

 Art, Japanese Language, Music, News, Photography, Technology  Comments Off on Progress Report
Jul 252013
 

So I start a lot of projects on this blog, and some get finished, some don’t. I use David Allen’s “Getting Things Done” approach to constantly examine what I want to do vs. what I can do. GTD is a lifesaver in that regard. It helps keep me focused when sometimes it feels like I’m being torn apart by ducks.

So here are some short updates on projects I’ve been wanting to work on/finish.

The Grammar Songs

I discovered that in order to make it work, I need to improve both my Japanese and my music production skills. I studied music from 4th grade all the way through college, so I know a lot about performing music, but I don’t know as much as I should about composing and producing it, which are two entirely different skill sets.

I’ve been using Coursera to work on the production side, and now I need to work more on the composition side. And when it comes to writing lyrics, that’s the result of daily writing exercises.

My Japanese is pretty good, but it’s not quite at that level yet, so I’m working on it. Same goes for melodies. I’m looking for a way to get more music theory under my belt.

Japanese Studies

Those are going pretty well. JOI makes it easy to load up on classes for grammar, conversation, and vocabulary when I need to, and they meet my level, which is a godsend. Being an advanced student in a room full of beginners can be helpful sometimes, but it’s hard to make progress that way. So I’m glad JOI has classes that meet my needs. That’s going well so far.

Also, because of work, I work with Japanese people on a pretty regular basis. The only downside is that since we’re in the US, we mostly speak English and follow US business customs. Not all the time, but a lot of it. Those times when I need to slip into Japanese Mode it comes in really handy.

3D and 2D Art

Well… that had to get put on the “I’ll do it after the JLPT” pile. There’s just too much going on right now, and too many projects require my attention, so I find it’s best to whittle it down to what I can handle. I still want to get into it, but I need to find the right time/place to do it.

I sketch whenever I can. I’m not very good at it, but it’s relaxing, and it’s fun. It also helps me with my photography, and my eye for how I want to compose photos.

Where ARE the Photos?

That’s another thing that’s being put on the shelf for now. I have a giant pile of photos to edit, and just no time to do it. Editing requires big chunks of time for me, and unless I’m getting paid to do it, I just do it when I can. I’m going through the older stuff and gradually adding it, though. I don’t know of a good way to bump old posts up to the top of the site just because they have new material. Maybe I’ll create a new tag?

Calligraphy/Shodo

Well, ever since my class in Raleigh ended, I’ve been going to my usual calligraphy classes. Before the classes in Raleigh ended, though, I spent some time studying Edo-moji, and that was a lot of fun. Now I’m trying to decide what to do next in calligraphy/shodo.

Other Site Stuff

I recently moved the site over to Suffusion, and I like it as far as CMS/frameworks go. I can’t really call it a template, because it’s more like a framework you have to set up and tweak yourself to get it to really sing. My current design is a little Spartan, but I’m from the Jakob Nielsen school of web design. It needs to be easy to read, and accessible first above everything.

Learning Lightroom 5 with George

 Photography, Technology  Comments Off on Learning Lightroom 5 with George
Jul 182013
 

I’m getting the hang of Lightroom 5 now thanks to George Jardine’s excellent new video series on mastering Lightroom. It’s really worth checking out if you want to get the most out of your photos, or if you’re like me, and stare at a so-so photo for 10 minutes, trying to figure out how to tease out the little bits that will make it better.

Sometimes a photo just isn’t salvageable, and that’s a shame. But George’s videos bring more photos into range of “fixable” for me.

One of the tools he really focuses on is the tone curve, more so than the other exposure controls in Lightroom 5. The nice thing about the Tone Curve is that it will “unbunch” bunched-up tones, bringing out the contrast. It does so without smushing up other tones as much as the sliders do. At least that’s my experience so far. I need more practice with the tone curve to make it work really well, though.

I picked up his Library videos a while back, and those were really useful, too. I have all of my photos cataloged and stored in folders where I can find everything fairly quickly, all on a small portable USB-3 hard drive I move from computer to computer. That way I don’t have to worry about messing up my catalog file. I just back that up to a removable HDD on a regular basis.

I recommend all of his Lightroom videos, they’re worth the money and very informative.

The money you’ll save on never buying presets again will more than cover the cost. Really, why would anyone use presets? No two photos are alike, so why would you treat all of your photos as if they’re all the same? I don’t understand the thinking.

My main problem now is plowing through the 10,000+ photos in my library backlog. I love to shoot photos, but edit them? Not so much. Picking just a few is always so agonizing. I love them all, even the really bad ones.

Fireworks!

 Photography  Comments Off on Fireworks!
Jul 042013
 

Last year I tried to take photos of the fireworks in Chapel Hill, and was met with kind of “meh” results. This year I met up with my SO and her mom, and we went to the stadium again for more small-scale fireworks, and I tried to get some photos that were better than last year’s.

I probably should have brought my new tripod with me, but I was worried about it causing a problem at security. (It wouldn’t have. I was over-cautious.) Next year I’ll have to use a tripod, or a monopod.

The photos were okay, but nothing really earth-shattering. Some were artistic, in the way blurry photos can be sometimes.

The fireworks were fun, if a bit loud. They were exploding right on top of us, because they were launched right inside the football stadium.

The method I used was to put the camera on BULB, set it to F/13 or so, 100 ISO, then just open it up when the fireworks go up, and let it go after a second or two. A cable release works best here to avoid camera shake. The Nex has a wireless cable release, but it’s kind of annoying to use. So I wound up using my 60D.

I’m not sure how I feel about that now in retrospect.

I think the best combo would be the Nex with the Leica 21, set to F13 or F16, a tripod, and cross my fingers a bit.

I’ll have to give it a shot next year.

AB!

 Food  Comments Off on AB!
Apr 192013
 

I’m a Good Eats fan. I’ve been a fan since the show first came on around 2000 for two reasons. First, Alton Brown is entertaining and writes a really fun and educational show, and second, he teaches the science behind cooking. I respect a well-produced show, and I love science in my cooking.

So it was a thrill to see Alton Brown perform live at DPAC in Durham last night. It was pretty awesome, if a bit random. He’s getting a show ready to take on tour, so things were a little improvised, but it was very enjoyable. He experimented with dry ice, liquid nitrogen, and other fun, moderately dangerous items to make food. Not necessarily the kind of stuff you’ll have lying around the kitchen.

One irritating thing: they said a few times, “No photography, please.” So what did the guy next to me do? Immediately stand up and shoot photos with his cell phone.

Pardon me, while I rest my face in my palm for a few minutes.

Alton did a Q-and-A after the show for about 30 minutes. I had no Qs for him to A, so I just enjoyed listening to everyone else’s questions.

If he comes to your town, I highly recommend checking his show out.

Snow and NEX BIOS Update

 Photography, Technology  Comments Off on Snow and NEX BIOS Update
Feb 132013
 

Two exciting things happened in my world today.

First, it snowed! Okay, it didn’t stick, and it wasn’t a whole lot, but it was pretty.

Second, Sony released a proper BIOS for the Nex 5N! Now it will do auto-bracketing of up to +/- 3.0 EV! That’s huge! Now the Nex is a “proper” camera in my opinion. I’m sufficiently pleased with it to the point that I’m okay with it if Sony abandons it from here on out. (They probably will, anyway, new NEX models have been out for a while now.)

Snow in the Mountains Again.

 Photography, Travel  Comments Off on Snow in the Mountains Again.
Dec 272012
 

It snowed last night and this morning in the mountains. I was up here with the whole family for Christmas. It was 2010 when it snowed about a foot up here. This time, it’s just a light dusting, maybe half an inch to an inch, which is really nothing for the mountains.

While I’ve been up here, I have taken a ton of photos of the mountains. Editing them is going to be like cleaning the Augean Stables.

I’ll edit this post once I’m all caught up.

In the Mountains Again

 Photography, Travel  Comments Off on In the Mountains Again
Dec 102012
 

I spent the last few days in the mountains, and came back in time for my calligraphy class in Raleigh tonight. I took a lot of photos of the mountains, and some good macro shots of Christmas tree ornaments. I really like the Canon 50/3.5 FD macro + NEX combination. It really needs a tripod to be perfect, but it’s just fun to mess around with.

Photography Stuff

 Photography  Comments Off on Photography Stuff
Dec 032012
 

One of the projects I want to get off the ground is copying a bunch of old slides I have. So I got out my old Kodak RFS 3600 scanner, plugged it in, and it just flashed lights at me. I emailed PIE International, the company that made it, and still makes a variant of it 10 years later, and they regretfully informed me that the RAM was dead.

I don’t feel like dropping more money on a scanner. I’d like to find a faster solution. And I think I did. Maybe.

According to some posts I’ve been reading on the DPReview message board, it looks like the best solution is going to be in 40-year-old technology. I picked up a Canon 35mm FD 3.5 lens, a Canon Bellows FL, and a Canon slide copier from KEH, and I also got an FD-E-mount adaptor ring to get it all to fit on my Nex.

It kind of works. It kind of doesn’t, because I haven’t figured out how to make the bellows fit tight enough to the body so that I get all 100% of the slide image in the slide copier. I can get about 98% of it, and me being me, that last 2% bugs the heck out of me. The solution probably involves removing the FL mount from the bellows, and changing it to something thinner, but I need to get help on that.

I tried mounting a 28mm lens, and that was a total bust. If I go wider than 35mm, the slide copier stops working, because I can’t focus it properly. So I’ll need to spend some time figuring out how to fix the lens mounts.

I also picked up a Canon FD 50mm f3.5 macro lens with a 2x extension tube. That’s a lot of fun.

Lighting up Lightroom

 Photography, Technology  Comments Off on Lighting up Lightroom
Nov 122012
 

I bought Adobe Lightroom 3.0 a year ago, before my trip to Japan last fall, along with the Photoshop CS5 upgrade. At the time, I figured that when I got to Japan, I would shoot a bunch of photos, and have the time to edit and sort them out. And somewhere in there, I’d have time to figure out how Lightroom worked, too.

How naive.

In reality, when I wasn’t wandering around in my spare time, I was studying until I passed out during the week. There was no time to learn something like Lightroom, which looked alien to me, who has used various iterations of Photoshop since version 3.0. (Not CS 3.0, 3.0.)

When I got back from Boston this year, I decided that my photos are not going to organize themselves, so I fired up Lightroom. “Let’s get this over with,” I thought with the same excitement one feels when going for a root canal.

And then I found out that Lightroom had been upgraded to version 4.0 (now 4.2, going on 4.3), and all of the cool kids were raving about it. Well, truthfully, they were raving about 3.0, too, but now it seemed like Lightroom did some cooler stuff, and generally processed photos better.

So I upgraded.

Learning to Love Lightroom

At first, I started messing with things to see what did what, and watched a few Adobe TV videos to get the feel for it, but while the library was pretty easy to figure out for someone like me who is familiar with databases, I had no idea what was going on in the develop module.

While I was desperately searching for some kind of help, I just happened to come across a link to George Jardine’s videos about Lightroom. Really, if I hadn’t been reading a totally unrelated thread on the Adobe message boards, I’m not sure I would have found these videos, and that would have been a shame.

George’s develop video series is about 6 hours long, and it contains 18 videos. I spent a weekend marathoning it, and by the time I was done, I finally understood how Lightroom’s develop module works, and I managed to figure out a way to process photos in a way that gives me results I like.

If you’re someone who likes to learn via YouTube, and are struggling with getting Lightroom to sing, I highly recommend George Jardine’s videos. They’re awesome. Just give up a day or two and watch them, then play with Lightroom to see what he’s getting at.

I have a bad habit of buying 4-inch thick $50 computer books, and later using them as doorstops. I have discovered that I just learn faster by watching videos of someone showing me how to do it.

One other thing: it took me until the series was completely over to really get everything sorted out in my head. I would recommend waiting until the last video before messing with publishing anything online, because you’ll wind up republishing it again.

And again.

If you’re like me, and have a massive pile of unprocessed photos, I highly recommend Lightroom. Once you get the process down, it’s an order of magnitude or two faster than Photoshop to power through with lots of quick, non-destructive edits. Now I don’t have to worry about saving 10 different versions of a 50MB file just to make sure I don’t screw things up. I can just dump all of my photos in one place, and let Lightroom do its thing.

More importantly, from within Lightroom I can publish my photos to my Flickr account, to my Picasa account, or send them to Costco to be printed up however I want. I love the plugins.

Here are a few links to some useful Lightroom sites:
http://thelightroomlab.com
http://www.lightroomforums.net/
http://tv.adobe.com/product/lightroom/episode/highest-rated/playlist/
http://www.lightroomqueen.com
http://www.mulita.com/

Calibrate that Nasty Monitor!

Before you start editing a bunch of photos, I would suggest that you do two things:

1. Calibrate your monitor. If you don’t know what that means, head to http://www.digitaldog.net and learn all about it.

I use a Spyder 3 Pro, and it does a pretty good job. You don’t have to get a Spyder, but get something to help you calibrate.

2. If you can’t find lens profiles for your camera/lens combo, you might want to create some of your own. Go to the Adobe web site and search for Adobe Lens Profile Downloader and Adobe Lens Profile Creator. With the downloader, you can search for profiles other people have uploaded, and with the creator, you can just make your own for those weird lenses you got off of eBay.

Another thing to consider, if you’re finicky about color, is the XRite ColorChecker Passport. It’s pretty handy for getting those white balances nailed, when the light is uniform. (When you’re dealing with mixed light, well, good luck with that.)

Liberated from Leica Lens Limbo (or Nex!)

 Photography  Comments Off on Liberated from Leica Lens Limbo (or Nex!)
Oct 292012
 

I mentioned that I’m using a Sony Nex in the blog on the trip to Boston, but I didn’t go into much detail about it.

Right before I headed off to Boston, I found a really good deal on the Nex 5N bundle, and picked one up. What impresses me about the Nex is not only the pictures it takes, but its E mount, which, with the right adapter, will take Leica M mount lenses.

This is very important to me!

A Little Backstory

Long ago, when I was in Journalism school, I bought a Leica M6 TTL, and it was (and still is) a great camera. The only problem I had with it is that by about 2006 or so I wanted to shoot digital, because it’s a much easier workflow. Is it better than film? Well, that’s another post.

Leica came out with its digital camera bodies around 2008 or so, and while I was excited by the concept, I was not excited about the price. At the time, I didn’t have $4000-$5000 lying around for what was essentially a camera body that will be worthless in 2-3 years.

The M8 was a fine camera, and while it had all of the Leica Juice going for it, as a digital platform, it was average at best.

Then Leica came out with the M9. It’s a much better camera than the M8, but it’s not worth $5-$6k. Meanwhile, companies like Canon, Nikon, and even Sony are pushing the limits of what prosumer cameras can do.

I love shooting Leica cameras. They’re excellent machines. They’re just not worth $7000. The M9 would have to do much much more than it does to merit $7k.

And it doesn’t. Leica does a great job of fitting its great lenses to a digital body, but that digital body isn’t any better than the digital body I could get from Canon or Nikon for 1/3 the price.

So for the last 5-6 years, my Leica gear has been gathering dust because Leica has failed to reach me as a former customer.

The company has priced me out of pretty much ever wanting to buy their gear again. The lenses are incredible, but I don’t have that kind of cash lying around. In the early 2000s, when lenses were more reasonably priced, I could afford to stay in the Leica system, but until now, it’s been impossible.

Saved by Sony

Then Sony released the Nex. I wasn’t particularly impressed by the first Nex, except for its ability to take M glass. My take on it then was that it was neat, but ultimately there were too many compromises.

So I waited.

When I saw the prices coming down on the 5N, I was ready to buy. I feel like the Nex has come far enough along, and the 5N was at a price point I could stomach.

I’m happy… for the most part.

It comes with a 18-55 kit lens, which is okay, but generally forgettable. It’s something to use for making videos with, because it’s autofocus, but as a tube with glass in it for taking pictures? I’m not too impressed. It’s a kit lens after all.

I picked up a $30 adapter ring, and all of my Leica lenses fit well enough. My 21mm doesn’t fit perfectly, but it’s good enough. (The latch doesn’t completely engage, but it engages.) The crop sensor is APS sized, and that works. It crops to make the 21’s field of view like a 34mm lens (roughly), but keep in mind that it won’t get rid of the fish bowl effect you get from shooting such a wide-angle lens. Also, you lose the shallower depth of field you’d get with a real 35mm lens on a full-frame sensor.

But I can finally shoot my Leica glass again! And I didn’t have to rob anybody to do it!

Manually focusing the Nex is something that takes getting used to. It uses focus peaking to help with manual focusing, but it’s far from perfect. I still have to zoom in to make sure I’m really in focus, and that adds to the time it takes to get a shot ready. So it’s not perfect.

Manually focusing a Leica is still faster by a good deal, but the Nex is 1/10th the price. I’ll take imperfect focusing for an extra $5-$6k in my pocket.

There’s no way around this: the Nex has a terrible bracketing mode. It only goes as far as +/- 0.7 EV, which is pretty much useless if you want to take HDR photos or just bracket your shots intelligently. Honestly, I don’t know what Sony was thinking. I hope they fix the BIOS in the camera for that. My worry is that with new cameras coming out soon, they may orphan the current Nex cameras, and just leave it unfixed. I knew it going in, but it really is a bad oversight on Sony’s part.

Finally, the viewfinder; it’s a separate purchase on the 5N. If you want it integrated in the camera, you have to shell out an extra $400 for the Nex 7, or buy a $250 adapter for the other cameras that fills your “hot shoe.” It’s not a real hot shoe, but it’s the closest you get to one. So you can either have a mic, a flash, a light, or the viewfinder. That’s leaving me scratching my head and wondering what the engineers are thinking.

Take the Good with the Bad

Even with the mixed bag of good and bad stuff, I’m generally pleased with the Nex. It takes great photos, even if the controls aren’t what I’d like.

I have to spend 5-10 seconds composing each photo to make sure it’s in focus. Sometimes longer. That makes it bad for action shots. For artsy shots, or scenery shots, it’s great. But trying to photo something like a cat or small child? Not so great. But in my case, it fills a badly needed niche.

I like my Canon 60D, and the 17-55 EFS is a great lens, but it’s lacking in the kind of sharpness I got used to with Leica glass. I can’t get the kinds of photos I could get with my Leica M6 TTL and my Leica lenses. Now that I can slap those lenses on the Nex, I can just about get those photos again, and use the 60D for more action-related stuff.

The Nex is definitely not for everyone, but if you’re like me, and stuck in that Leica purgatory where you can’t afford the bodies, but you still have the lenses, it’s an affordable option.

Nijo Castle (Sunday, Part 1)

 Japan, Photos, Travel  Comments Off on Nijo Castle (Sunday, Part 1)
Nov 272011
 

Wow. If yesterday was busy, today might just have been busier. It’s a tough call.

I got up at 6:30, took my time getting ready, and then got stuck thinking about where I wanted to go to first, so I didn’t check out until 9:00 a.m.

When I got on the train to Kyoto at Shin-Osaka, it was jammed, so I had to stand all the way to Kyoto.

This was the start of a trend.

I got to Kyoto, and had to find a locker. This was a problem. Yesterday, I got to the station nice and early, around 8:30, so there were plenty of lockers to choose from.

But today, I only got in at around 9:45, and by then, about all of the lockers were gone. It was a fight to find something to cram my bags into. I really recommend getting to the station as early as possible if you want to use the lockers on the weekends. They fill up fast, especially the big ones Americans like me like to use.

I managed to find a locker eventually. B1F of Kyoto Station is your friend, locker-seeking people.

No Leaves? No Worries!

After that, I decided to go to Nijo Castle. My logic went like this: it’s historic, a World Heritage Site, and should be relatively devoid of leaf gawkers. Nijo Castle was the Kyoto residence of the Shoguns for over 200 years, so it’s a good place to visit in Kyoto if you want to see some history, and you’ve already had your fill of shrines and temples.

It was perfect for what I wanted. The grounds were great. Very attractive, but not full of fall colors to attract huge crowds. Well, there were some trees to look at, but since it wasn’t in any of the magazines, there wasn’t a huge crush of people.

Entering the main east gate:
Entering Nijo Castle

There was one guy who created a small stir around him– he was taking pictures of some kind of action figure around the castle. As long as it’s fun, keep on keepin’ on.
Photographing a Toy at Nijo Castle

The main castle was interesting. The main attraction for me were the “Nightingale Floors,” which squeaked like crazy so that nobody could sneak up on you.

Coming to the Kara-mon, which is the entry to the Ninomaru Palace (where the “Nightingale Floors” are.):
Kara-mon
Entering the Kara-mon:
Kara-mon
The old Carriage Receiving Area in front of the Ninomaru Palace:
Ninomaru Palace Carriage Approach

After my tour of the interior of the Ninomaru Palace (no photography allowed), I saw these two bells outside of the entry/exit:
Bells

I turned down a path that led into the Ninomaru Palace Garden, and turned back to look at the palace building:
Ninomaru Palace

Looking down at the Kuroshoin:
Kuroshoin

The main pond at the Ninomaru Palace Gardens:
Ninomaru Garden

After that, I headed to the Honmaru portion of Nijo Castle. Here’s the bridge over the inner moat, leading to the main gate to the Honmaru:
Bridge to Honmaru

Right after passing through the gate:
Entry to the Honmaru

The Honmaru is actually a building from the Kyoto Imperial Palace. It replaces an older castle building here that burned down:
Honmaru
Another shot of the Honmaru, as I’m walking by:
Honmaru

After that, I climbed up the remains of the old donjon, where there’s a neat viewing platform, and took this photo of the Honmaru area:
View of the Honmaru from the old Donjon

Here’s a shot of the western gate leading out of the Honmaru, over the inner moat, from the top of the old Donjon:
Western Bridge out of the Honmaru

When I finished up the main route through the castle and grounds, I wound up at the far corner of things, about 1 Km away from the entrance, so I had to hike all the way back to the entrance. It wasn’t as bad as it sounds.

On the way to the exit, I found the Koun-Tei. (I think it’s a place to have tea?):
Koun-Tei
It looked beautiful reflected in the pond:
Koun-Tei Reflected in Pond

The landscaping was nice. The ginkgo trees were especially pretty, because their leaves were a brilliant shade of yellow:
Gingko Tree
Some gnarled-looking trees:
More Gnarled Trees

After all of that, I headed to the bus stop outside of the Castle. I wasn’t sure what I wanted to do next until I saw a bus go by that said “Kinkakuji” on it, and figured, “What the heck. I haven’t been there in a few years.” Then I looked inside the bus, and it was jammed all the way to the entrance doors. There was no way to even get on the bus, unless you just pushed your way on.

The people ahead of me in line were apparently not familiar with the concept of just cramming yourself in the bus, which is as applicable as it is on subways. It’s not like the next bus is going to be any LESS crowded, so you’re going to have to suck it up eventually if you want to get anywhere. There is no magically empty bus waiting for you, my dear princes and princesses. This is the height of tourist season, and everyone is on that bus, and everyone else is going to be on the next bus.

I met a nice guy from India while standing in line for the bus who went to the University of Michigan, so we chatted while waiting for the next bus to show up. Then we gritted our teeth and shoved our way on.

I’ll continue this in a “part 2” post, too, because it’s getting long.

Nagoya and the Port Area.

 Japan, Photography, Photos, Travel  Comments Off on Nagoya and the Port Area.
Nov 122011
 

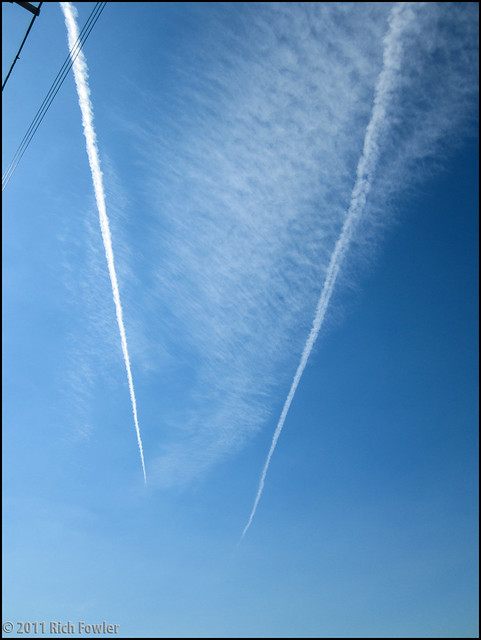
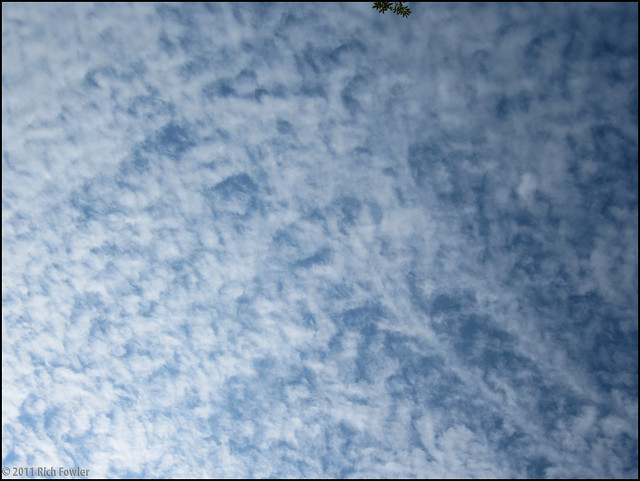
It’s Saturday, and the sun was out. Amazing. Not one cloud in the sky.

I felt that I must go on an excursion in this lovely weather!

Carrier!

While I planned out the day’s activities, I watched a college basketball game between UNC (my alma mater) and Michigan State on an aircraft carrier in California via the Slingbox, which has decided to work again.

It’s weird when you think about it. From Japan, I watched a team from North Carolina play a team from Michigan on the deck of a ship in California, then the signal went to my house in NC, where it was then sent to me in Japan.

That kind of makes my head hurt.

After the game ended, I headed out to the station, and off to Nagoya. I noticed two things on the train ride over. First, the engineer was a woman. She’s the first woman engineer I’ve noticed so far. Cool. The second was not so cool. There was this really odd guy who was talking to himself, gesturing wildly, and going through incredible mood swings as trains came and went. I was just hoping he wouldn’t decide to suddenly heed the voice telling him to kill the big guy with the red hair 5 seats back.

There was also a guy in capri pants. No I don’t know why.

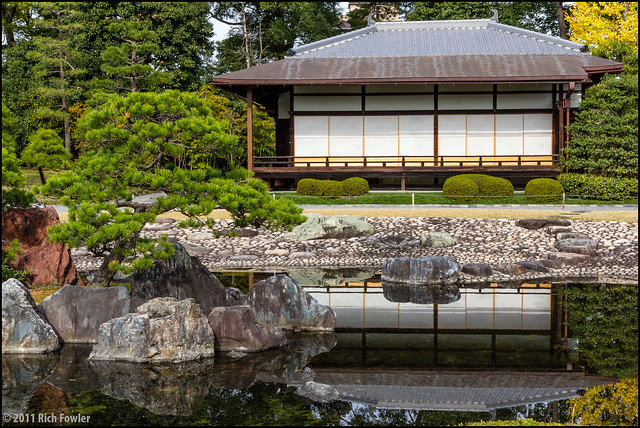
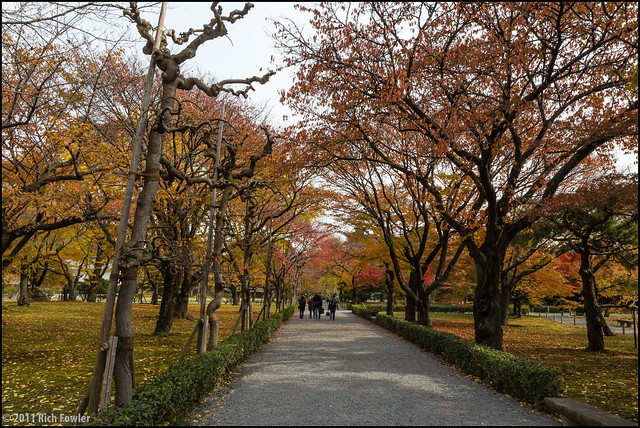
I got off at Kaneyama, so i could go to Atsuta Jinja, which is a pretty nice Shinto shrine in Nagoya with lots of history behind it. It’s where I saw an Iaido demo four years ago. It’s very park-like, but not very remarkable otherwise. It’s a nice place for a stroll, though. I was kind of hoping for something photo-worthy, but didn’t take any. Nothing really worth digging the camera out for. That said, it’s worth a trip if you’re in the area. It’s a nice place with a lot of history.

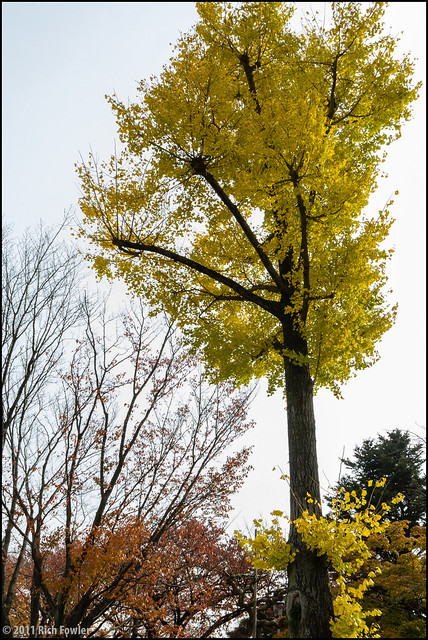
I did see a sakura tree blooming in the wrong season. So I can check that off the list. After the Nagoya Castle trip, I was kind of surprised to run into one there.

I probably should have taken a picture, but it wasn’t all that impressive, since all of the leaves were gone.

Port Call

After that, I headed to the subway station and took the train to the Port area. Getting to the Port area can be tricky if you don’t know your way around Nagoya’s subway. The purple line goes around Nagoya in a big circle, and then there’s a tail or spur of it that goes on to the Port area. You have to figure out which train you need to ride to get there. I managed to figure it out and headed down to the Port area, which took about 10-15 minutes. It’s at the end of the line.

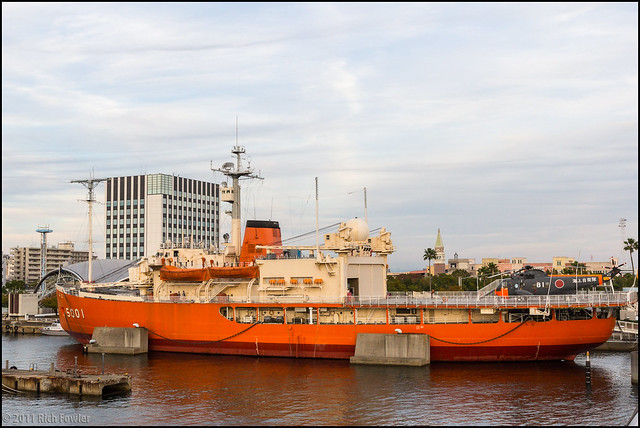
I got out and wandered around a little bit. The first thing I noticed was a big orange boat.

Icebreaker "Fuji" at Nagoya Port -- Closeup

The second thing I noticed was a Red Lobster.

Red Lobster.

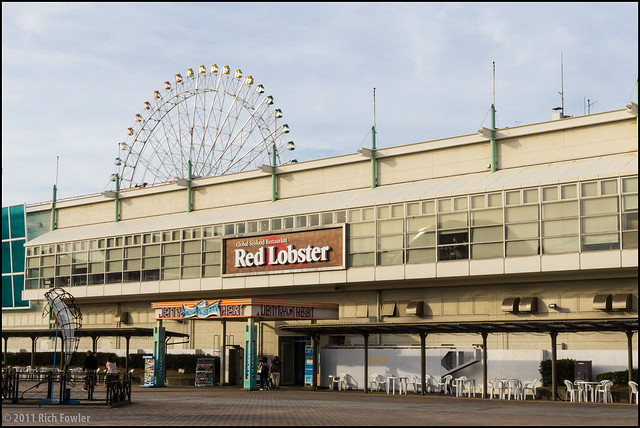
Why there was a Red Lobster in Japan is one of those unanswerable questions for me. By the Port, no less. In a land that specializes in fresh seafood.

WHYYYY???

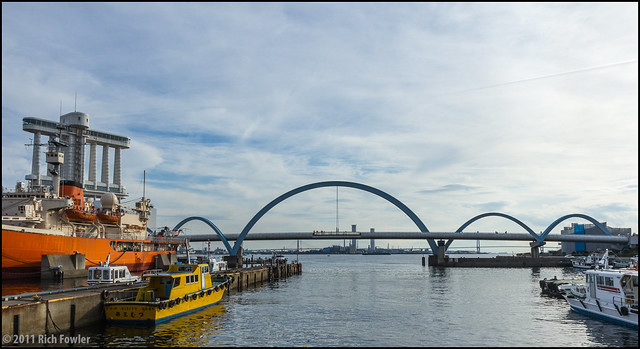
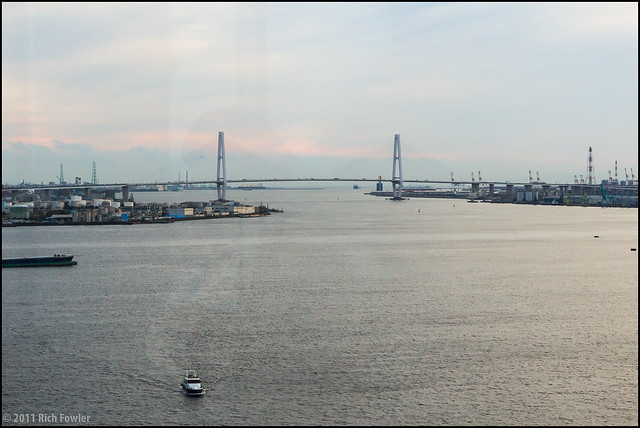
The area has a charm to it. I like the Port Bridge:

Fuji and Port Bridge

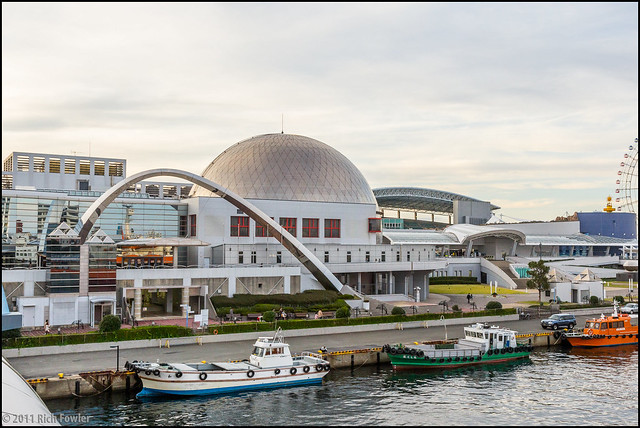
Speaking of fresh seafood, right next to the Red Lobster was the Nagoya Aquarium, which was chock full of aquatic species.

Port Bridge and Aquarium
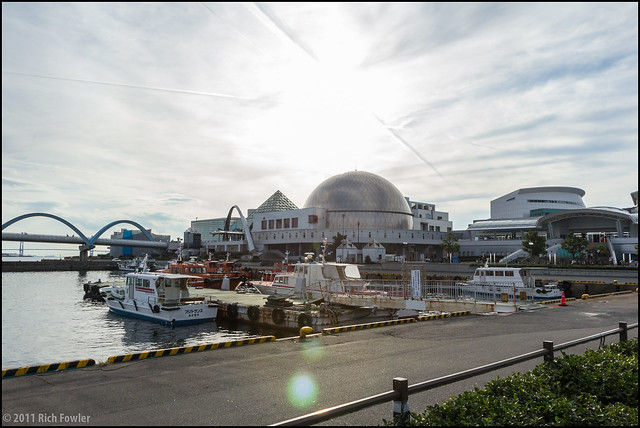
Since it was one of my objectives for the day, I headed on over. First off was the dolphin tank. They were very cute, but the water was kind of dirty.

Then I headed up to have a look at the dolphin show. It was included in the price of the ticket, so I might as well have a look. The dolphins were impressive, but I always have mixed feelings about performing dolphins. On the one hand, I’d rather they were free to do whatever they wanted to. But on the other, dolphins quite often get the short end of the stick in the wild, no thanks to us. And they did some impressive stuff.

After that, I headed to the aquarium proper, to do some staring at fish. There are lots of fish to stare at. I dunno… I’m not a huge fan of fish-staring. I tend to walk quickly through aquariums, unless they have something distinctive to hook me.

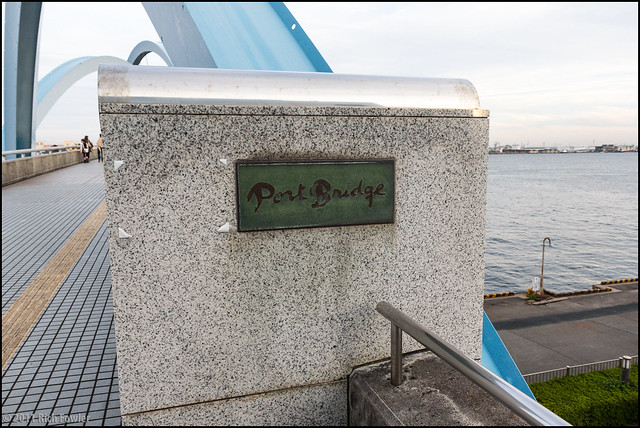
Fish sufficiently stared at, I left, and headed over to the Port Bridge, which is an interestingly designed footbridge that lets you cross one over from one side of the Port area to the other. (Well, I say Port area, but this is really just one little harbor. The whole Port area is much bigger.)

Port Bridge Sign

Crossing the Port Bridge

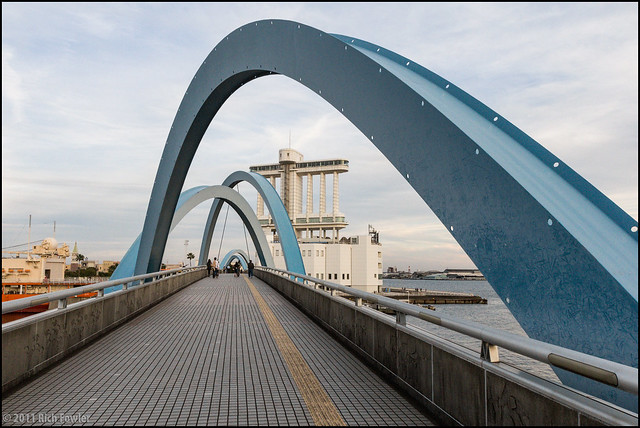
Some of the views from the bridge:

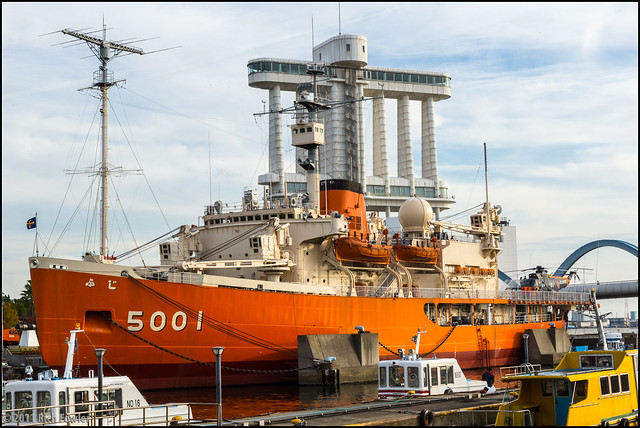
First the former icebreaker-turned-museum “Fuji”:

Retired Icebreaker Fuji

Another shot of the Aquarium:

Port of Nagoya Aquarium

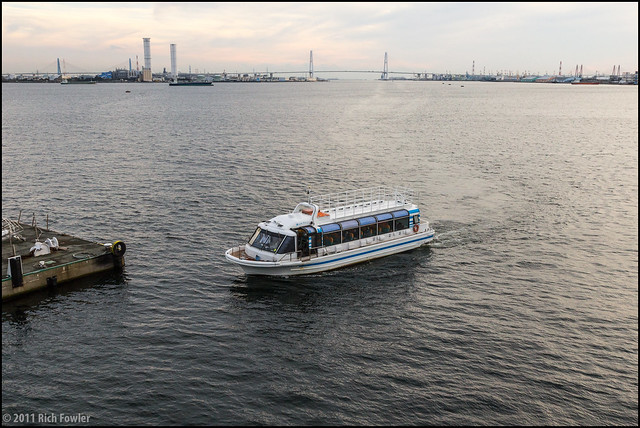
And a shot of a passenger boat coming into port:

Ship pulling into dock.

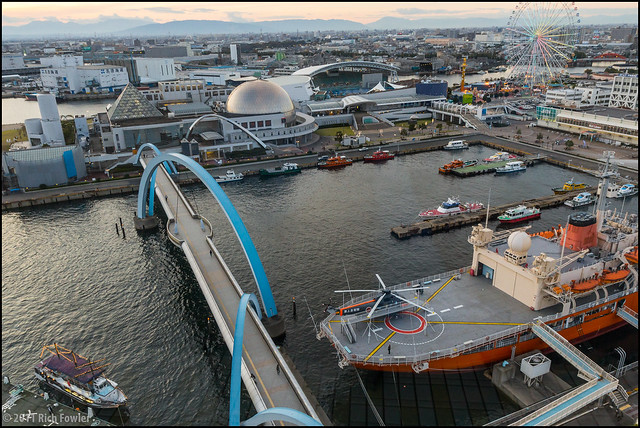
After that, I headed to the oddly-shaped Port Building, which has a really neat observation deck about 50 meters or so above the ground. There are some great views from there. I had to hustle to get there before everything closed, of course. Downside was that because I still haven’t bought a circular polarizer, I had a lot of reflections in the shots I took. Ugh. But I managed to get a few keepers. The views were spectacular as the sun set over the bay.

Sorry about the reflections!

View from the Port Building

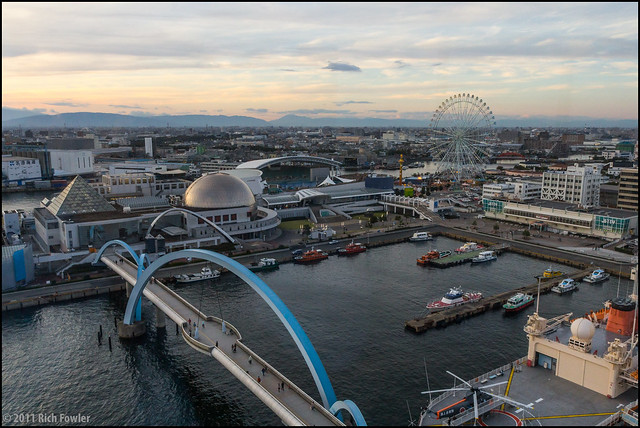
Some shots of the port area:

Aquarium, Bridge, Fuji, etc.

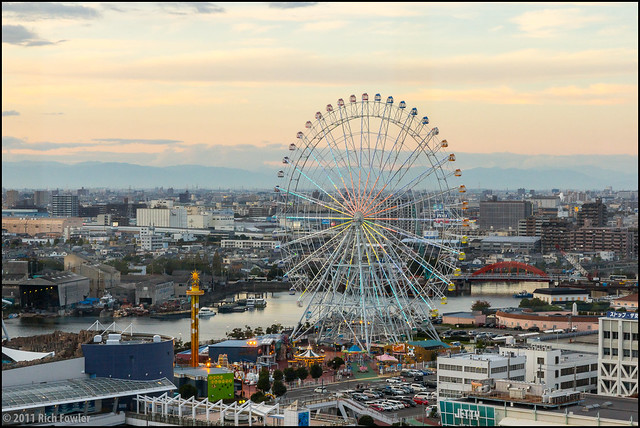
A zoom-in of the amusement park:

Ferris Wheel at Sunset

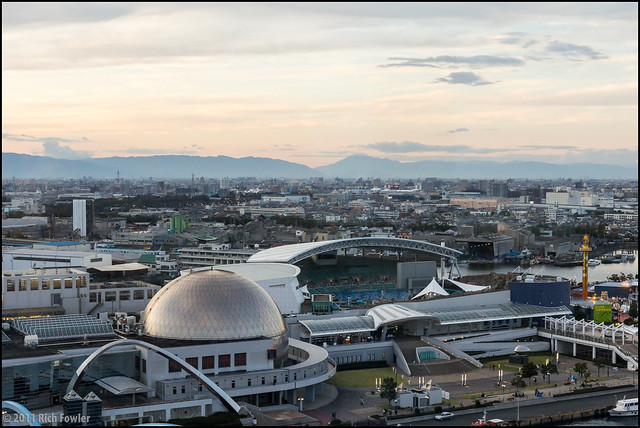
A shot of the dolphin show stadium at the aquarium:

Port of Nagoya Aquarium

I like this angled shot:

Aquarium, Bridge, Fuji, etc.

The Triton bridge, off in the distance:

Nagoya Port, Triton Bridge

One last shot of the port area:

One last shot of the Port Area

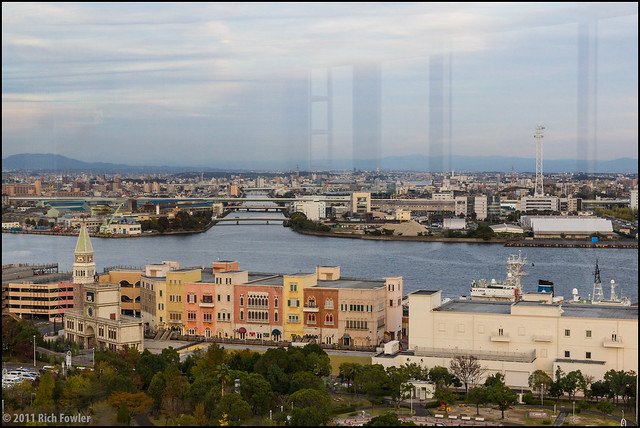
Finally, a shot looking towards downtown Nagoya:

Midtown in the Distance

This Really Is Turning Into A Shopping Blog, Isn’t It?

After that, I headed to Sakae and Book-Off, and had no luck finding books on Japanese Language study generally, and Minna no Nihongo, specifically. Naturally, tons of books in Japanese, but none of the books I wanted on Japanese, like textbooks and such. Well, I did find one. And I did find some light novels, too. I headed to Hisayaodori afterwards to pick up some new light novels as well.

I hopped a train to JR Nagoya and first stopped off at Krispy Kreme to get some doughnuts for snacking later this week, then dropped everything in a locker because it was getting heavy.

I headed to Bic Camera after that to see what was going on with the PS Vita pre-sales. They had finally managed to sell-out their pre-orders. I also took a look to see if they had any extra dictionaries for my Casio, but no luck. I’m trying to find the Kenkyuusha Japanese-English Dictionary for my new electronic dictionary.

I went to Mokumoku for dinner again. 食べ放題 (たべほうだい tabehoudai– all you can eat) is a scary thing. Mokumoku has some great food, especially the beef stew. It’s also good to get some vegetables in my system. I really can’t recommend Mokumoku enough if you just want to pound down some really fine organic food in Nagoya. It’s a little pricey, but then again, everything is pricey here.

I got home at 10:45 p.m. Long day, but fun.

The Flowers of Yamasa

 Japan, Photography, Photos, Travel  Comments Off on The Flowers of Yamasa
Oct 212011
 

Okay, I’m done with the sky.

For the last couple of days, I’ve been taking pictures of flowers, to see how the macro function works on the IXY. It’s pretty good. Not stunningly great, but better than a cell phone camera, and that’s all I can hope for.

So behold, the shy, dainty flowers of Yamasa. (Okay, some of them are weeds, but the still looked interesting to me, and it was something to do in-between classes!)

Flowers at Yamasa


I like the detail on the left flower. The right flower is out of focus. A weak point of the IXY’s macro mode.

Flowers at Yamasa 2


It’s a little head-on and bulls’-eyed, but I liked this flower. The IXY did a decent job, considering I was hand-holding the camera.

Flowers at Yamasa 3

Flowers at Yamasa 4


The IXY did a good job with this weed/plant, too.

Flowers at Yamasa 5

Flowers at Yamasa 6


And finally, a shot of the South Okazaki Hospital sign/top floor, with lots of power lines in the way:

South Okazaki Hospital Sign From Yamasa

Next up is a story about my trip to Nagoya Castle. Good times.

The Skies of Okazaki

 Japan, Photography, Photos, Travel  Comments Off on The Skies of Okazaki
Oct 192011
 

In-between classes, I started messing around with my new Canon IXY. Mostly, I took pictures of the sky, because I saw some interesting stuff in it. Yesterday, I saw some neat looking contrails from jets going wherever they’re going. Today, I saw some beautiful shimmery clouds.

Oh, and I also took a photo of a goldenrod weed near the school. Just because.

The 10-minute breaks are welcome, but sometimes it’s difficult to figure out what I want to do for 10 minutes. It’s just enough time to realize it’s not enough.

And now, the photos:

The contrails looked cool, and had a kind of lonely feel to them:

Contrails 1

Contrails 2

Sideways shot!

Contrails 3

Power lines interfere with a lot of my photography in Japan.

Power Lines

It’s annoying.

Power Lines 2

I liked the blue wall and yellow/green plant combination here. Just a weed near Yamasa.

Goldenrod, I think.

I really like this shot. The sky was kind of shimmery, and Aoi Hall was its usual corrugated self. Makes an interesting shot. Thanks, Lightroom!

Shiny Sky 1

Now just the sky without Aoi Hall:

Shiny Sky 2

One more:

Shiny Sky 3

If you look at it the right way, doesn’t this look like a dragon’s head? Just a bit?

Dragon!

Aug 072009
 

No, I didn’t go hunting with Mr. Shakespeare. This is about going out and taking pictures with my Bard camera bag by F-stop.

It’s one thing to use a bag to carry stuff around with, but it’s something entirely different to go out in the field and use it as a tool. I’ve had a few opportunities to take my camera and lenses out with the Bard and go shooting, and here are my impressions so far.

First off, size. It’s bigger than you think. I’m glad I bought the Bard instead of the Maverick. I’m sure the Maverick is a great bag, but I would be hating life at the end of a day of walking around town carrying my gear in something that huge.

The Bard itself is pretty large, and since it has firm sides, it doesn’t really “squish” down a whole lot. So when I’m carrying it around, it’s a bit bulky and can get in the way. It takes a little getting used to.

The bag has a waist strap… which I didn’t use much. I just couldn’t get comfortable with it. I might be missing out, or maybe there’s a better aftermarket waist strap. Or maybe I’m just not optimally-sized to use it. I’m going to try it again when I go out taking pictures again. Maybe I’ll like it better over time. Maybe not.

The shoulder strap is okay. It’s a $99 bag, so I didn’t expect it to be perfect. The shoulder strap is a little on the thin side, and a little on the narrow side. I like my shoulder straps thick and squishy, especially if I carry my bag all day. I’ll probably look aftermarket.

Minor gripes aside, my Canon fits perfectly with the 17-55mm f2.8 attached, pointing down. All I had to do was yank it out and shoot. I left one lens bay open, and I could stuff a rain jacket in it. (Which was perfect, because it rained a lot in the mountains.) My monstrously-huge (and heavy) 80-200 f2.8L sat in the other bay.

As a travel bag, I managed to cram an incredible amount of junk in it. Since I was going by car, I could get away with it. I’m not sure I’d recommend that for airline travel, though. It won’t fit under the seat in front of you in economy, but it will fit in the overhead compartment. So if you’re going to take it on an airplane, that’s going to be your only option.

All-in-all, it’s a very nice bag if you’re looking for an affordable alternative to the Crumpler bags. It’s a great messenger-style bag that doesn’t yell “Look at me!” or “Steal me!” quite so much, but I still got looks when I yanked out my camera. I don’t think you can avoid that no matter what bag you use.

This blog is protected by Dave\'s Spam Karma 2: 3159 Spams eaten and counting...